Chapter 11. The Blockchain
The blockchain is the history of every confirmed Bitcoin transaction. It’s what allows every full node to independently determine what keys and scripts control which bitcoins. In this chapter, we’ll look at the structure of the blockchain and see how it uses cryptographic commitments and other clever tricks to make every part of it easy for full nodes (and sometimes lightweight clients) to validate.
The blockchain data structure is an ordered, back-linked list of blocks of transactions. The blockchain can be stored as a flat file or in a simple database. Blocks are linked “back,” each referring to the previous block in the chain. The blockchain is often visualized as a vertical stack, with blocks layered on top of each other and the first block serving as the foundation of the stack. The visualization of blocks stacked on top of each other results in the use of terms such as “height” to refer to the distance from the first block, and “top” or “tip” to refer to the most recently added block.
Each block within the blockchain is identified by a hash, generated using the SHA256 cryptographic hash algorithm on the header of the block. Each block also commits to the previous block, known as the parent block, through the “previous block hash” field in the block header. The sequence of hashes linking each block to its parent creates a chain going back all the way to the first block ever created, known as the genesis block.
Although a block has just one parent, it can have multiple children. Each of the children commits to the same parent block. Multiple children arise during a blockchain “fork,” a temporary situation that can occur when different blocks are discovered almost simultaneously by different miners (see “Assembling and Selecting Chains of Blocks”). Eventually only one child block becomes part of the blockchain accepted by all full nodes, and the “fork” is resolved.
The “previous block hash” field is inside the block header and thereby affects the current block’s hash. Any change to a parent block requires a child block’s hash to change, which requires a change in the pointer of the grandchild, which in turn changes the grandchild, and so on. This sequence ensures that, once a block has many generations following it, it cannot be changed without forcing a recalculation of all subsequent blocks. Because such a recalculation would require enormous computation (and therefore energy consumption), the existence of a long chain of blocks makes the blockchain’s deep history impractical to change, which is a key feature of Bitcoin’s security.
One way to think about the blockchain is like layers in a geological formation, or glacier core sample. The surface layers might change with the seasons, or even be blown away before they have time to settle. But once you go a few inches deep, geological layers become more and more stable. By the time you look a few hundred feet down, you are looking at a snapshot of the past that has remained undisturbed for millions of years. In the blockchain, the most recent few blocks might be revised if there is a chain reorganization due to a fork. The top six blocks are like a few inches of topsoil. But once you go more deeply into the blockchain, beyond six blocks, blocks are less and less likely to change. After 100 blocks back there is so much stability that the coinbase transaction—the transaction containing the reward in bitcoin for creating a new block—can be spent. While the protocol always allows a chain to be undone by a longer chain and while the possibility of any block being reversed always exists, the probability of such an event decreases as time passes until it becomes infinitesimal.
Structure of a Block
A block is a container data structure that aggregates transactions for inclusion in the blockchain. The block is made of a header, containing metadata, followed by a long list of transactions that make up the bulk of its size. The block header is 80 bytes, whereas the total size of all transactions in a block can be up to about 4,000,000 bytes. A complete block, with all transactions, can therefore be almost 50,000 times larger than the block header. Table 11-1 describes how Bitcoin Core stores the structure of a block.
| Size | Field | Description |
|---|---|---|
4 bytes | Block Size | The size of the block, in bytes, following this field |
80 bytes | Block Header | Several fields form the block header |
1–3 bytes (compactSize) | Transaction Counter | How many transactions follow |
Variable | Transactions | The transactions recorded in this block |
Block Identifiers: Block Header Hash and Block Height
The primary identifier of a block
is its cryptographic hash, a commitment made by hashing the
block header twice through the SHA256 algorithm. The resulting 32-byte
hash is called the block hash but is more accurately the block header
hash, because only the block header is
used to compute it. For example,
000000000019d6689c085ae165831e934ff763ae46a2a6c172b3f1b60a8ce26f is
the block hash of the first block on Bitcoin’s blockchain. The block hash
identifies a block uniquely and unambiguously and can be independently
derived by any node by simply hashing the block header.
Note that the block hash is not actually included inside the block’s data structure. Instead, the block’s hash is computed by each node as the block is received from the network. The block hash might be stored in a separate database table as part of the block’s metadata, to facilitate indexing and faster retrieval of blocks from disk.
A second way to identify a block is by its position in the blockchain,
called the block height. The
genesis block is at block height 0 (zero) and is the
same block that was previously
referenced by the following block hash
000000000019d6689c085ae165831e934ff763ae46a2a6c172b3f1b60a8ce26f. A
block can thus be identified in two ways: by referencing the block hash
or by referencing the block height. Each subsequent block added “on top”
of that first block is one position “higher” in the blockchain, like
boxes stacked one on top of the other. The block height 800,000 was
reached during the writing of this book in mid-2023, meaning there were
800,000 blocks stacked on top of the first block created in January
2009.
Unlike the block hash, the block height is not a unique identifier. Although a single block will always have a specific and invariant block height, the reverse is not true—the block height does not always identify a single block. Two or more blocks might have the same block height, competing for the same position in the blockchain. This scenario is discussed in detail in the section “Assembling and Selecting Chains of Blocks”. In early blocks, the block height was also not a part of the block’s data structure; it was not stored within the block. Each node dynamically identified a block’s position (height) in the blockchain when it was received from the Bitcoin network. A later protocol change (BIP34) began including the block height in the coinbase transaction, although its purpose was to ensure each block had a different coinbase transaction. Nodes still need to dynamically identify a block’s height in order to validate the coinbase field. The block height might also be stored as metadata in an indexed database table for faster retrieval.
The Genesis Block
The first block in the blockchain is called the genesis block and was created in 2009. It is the common ancestor of all the blocks in the blockchain, meaning that if you start at any block and follow the chain backward in time, you will eventually arrive at the genesis block.
Every node always starts with a blockchain of at least one block because the genesis block is statically encoded within Bitcoin Core, such that it cannot be altered. Every node always “knows” the genesis block’s hash and structure, the fixed time it was created, and even the single transaction within. Thus, every node has the starting point for the blockchain, a secure “root” from which to build a trusted blockchain.
See the statically encoded genesis block inside the Bitcoin Core client in chainparams.cpp.
The following identifier hash belongs to the genesis block:
000000000019d6689c085ae165831e934ff763ae46a2a6c172b3f1b60a8ce26f
You can search for that block hash in almost any block explorer website, such as blockstream.info, and you will find a page describing the contents of this block, with a URL containing that hash:
https://blockstream.info/block/000000000019d6689c085ae165831e934ff763ae46a2a6c172b3f1b60a8ce26f
Alternatively, you can get the block using Bitcoin Core on the command line:
$ bitcoin-cli getblock \
  000000000019d6689c085ae165831e934ff763ae46a2a6c172b3f1b60a8ce26f
{"hash":"000000000019d6689c085ae165831e934ff763ae46a2a6c172b3f1b60a8ce26f","confirmations":790496,"height":0,"version":1,"versionHex":"00000001","merkleroot":"4a5e1e4baab89f3a32518a88c3[...]76673e2cc77ab2127b7afdeda33b","time":1231006505,"mediantime":1231006505,"nonce":2083236893,"bits":"1d00ffff","difficulty":1,"chainwork":"[...]000000000000000000000000000000000000000000000100010001","nTx":1,"nextblockhash":"00000000839a8e6886ab5951d7[...]fc90947ee320161bbf18eb6048","strippedsize":285,"size":285,"weight":1140,"tx":["4a5e1e4baab89f3a32518a88c31bc87f618f76673e2cc77ab2127b7afdeda33b"]}
The genesis block contains a message within it. The coinbase transaction input contains the text “The Times 03/Jan/2009 Chancellor on brink of second bailout for banks.” This message was intended to offer proof of the earliest date this block could have been created, by referencing the headline of the British newspaper The Times. It also serves as a tongue-in-cheek reminder of the importance of an independent monetary system, with Bitcoin’s launch occurring at the same time as an unprecedented worldwide monetary crisis. The message was embedded in the first block by Satoshi Nakamoto, Bitcoin’s creator.
Linking Blocks in the Blockchain
Bitcoin full nodes validate every block in the blockchain after the genesis block. Their local view of the blockchain is constantly updated as new blocks are found and used to extend the chain. As a node receives incoming blocks from the network, it will validate these blocks and then link them to its view of the existing blockchain. To establish a link, a node will examine the incoming block header and look for the “previous block hash.”
Let’s assume, for example, that a node has 277,314 blocks in the local copy of the blockchain. The last block the node knows about is block 277,314, with a block header hash of:
00000000000000027e7ba6fe7bad39faf3b5a83daed765f05f7d1b71a1632249
The Bitcoin node then receives a new block from the network, which it parses as follows:
{"size":43560,"version":2,"previousblockhash":"00000000000000027e7ba6fe7bad39faf3b5a83daed765f05f7d1b71a1632249","merkleroot":"5e049f4030e0ab2debb92378f53c0a6e09548aea083f3ab25e1d94ea1155e29d","time":1388185038,"difficulty":1180923195.25802612,"nonce":4215469401,"tx":["257e7497fb8bc68421eb2c7b699dbab234831600e7352f0d9e6522c7cf3f6c77","[... many more transactions omitted ...]","05cfd38f6ae6aa83674cc99e4d75a1458c165b7ab84725eda41d018a09176634"]}
Looking at this new block, the node finds the previousblockhash field,
which contains the hash of its parent block. It is a hash known to the
node, that of the last block on the chain at height 277,314. Therefore,
this new block is a child of the last block on the chain and extends the
existing blockchain. The node adds this new block to the end of the
chain, making the blockchain longer with a new height of 277,315.
Figure 11-1 shows the chain of three blocks, linked by
references in the previousblockhash field.
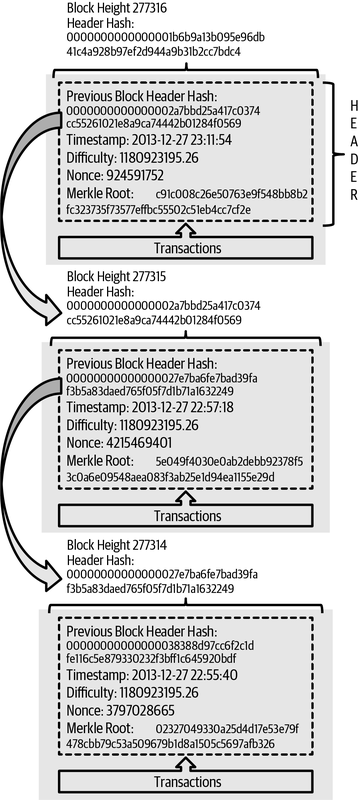
Figure 11-1. Blocks linked in a chain by each referencing the previous block header hash.
Merkle Trees
Each block in the Bitcoin blockchain contains a summary of all the transactions in the block using a merkle tree.
A merkle tree, also known as a binary hash tree, is a data structure used for efficiently summarizing and verifying the integrity of large sets of data. Merkle trees are binary trees containing cryptographic hashes. The term “tree” is used in computer science to describe a branching data structure, but these trees are usually displayed upside down with the “root” at the top and the “leaves” at the bottom of a diagram, as you will see in the examples that follow.
Merkle trees are used in Bitcoin to summarize all the transactions in a block, producing an overall commitment to the entire set of transactions and permitting a very efficient process to verify whether a transaction is included in a block. A merkle tree is constructed by recursively hashing pairs of elements until there is only one hash, called the root, or merkle root. The cryptographic hash algorithm used in Bitcoin’s merkle trees is SHA256 applied twice, also known as double-SHA256.
When N data elements are hashed and summarized in a merkle tree, you can
check to see if any one data element is included in the tree with
about log2(N) calculations, making this a very efficient data
structure.
The merkle tree is constructed bottom-up. In the following example, we start with four transactions, A, B, C, and D, which form the leaves of the merkle tree, as shown in Figure 11-2. The transactions are not stored in the merkle tree; rather, their data is hashed and the resulting hash is stored in each leaf node as HA, HB, HC, and HD:
HA = SHA256(SHA256(Transaction A))
Consecutive pairs of leaf nodes are then summarized in a parent node by concatenating the two hashes and hashing them together. For example, to construct the parent node HAB, the two 32-byte hashes of the children are concatenated to create a 64-byte string. That string is then double-hashed to produce the parent node’s hash:
HAB = SHA256(SHA256(HA || HB))
The process continues until there is only one node at the top, the node known as the merkle root. That 32-byte hash is stored in the block header and summarizes all the data in all four transactions. Figure 11-2 shows how the root is calculated by pair-wise hashes of the nodes.
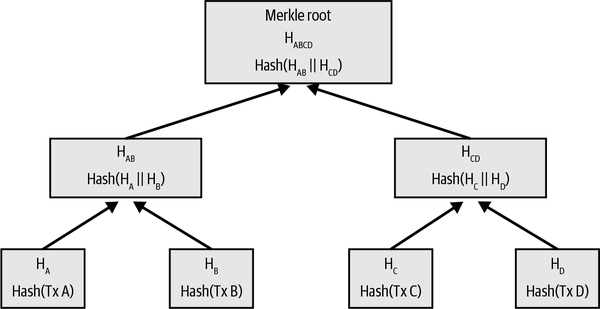
Figure 11-2. Calculating the nodes in a merkle tree.
Because the merkle tree is a binary tree, it needs an even number of leaf nodes. If there are an odd number of transactions to summarize, the last transaction hash will be duplicated to create an even number of leaf nodes, also known as a balanced tree. This is shown in Figure 11-3, where transaction C is duplicated. Similarly, if there are an odd number of hashes to process at any level, the last hash is duplicated.
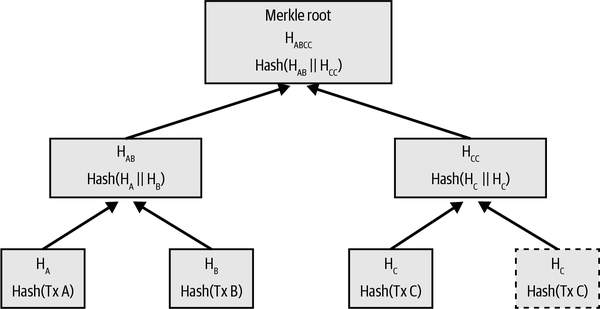
Figure 11-3. Duplicating one data element achieves an even number of data elements.
The same method for constructing a tree from four transactions can be generalized to construct trees of any size. In Bitcoin it is common to have several thousand transactions in a single block, which are summarized in exactly the same way, producing just 32 bytes of data as the single merkle root. In Figure 11-5, you will see a tree built from 16 transactions. Note that although the root looks bigger than the leaf nodes in the diagram, it is the exact same size, just 32 bytes. Whether there is one transaction or ten thousand transactions in the block, the merkle root always summarizes them into 32 bytes.
To prove that a specific transaction is
included in a block, a node only needs to produce approximately log2(N) 32-byte
hashes, constituting an authentication path or merkle path
connecting the specific transaction to the root of the tree. This is
especially important as the number of transactions increases because
the base-2 logarithm of the number of transactions increases much more
slowly. This allows Bitcoin nodes to efficiently produce paths of 10 or
12 hashes (320–384 bytes), which can provide proof of a single
transaction out of more than a thousand transactions in a multimegabyte
block.
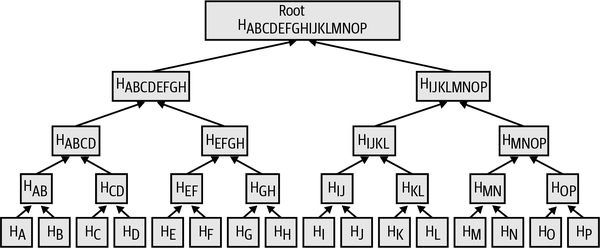
Figure 11-5. A merkle tree summarizing many data elements.
In Figure 11-6, a node can prove that a transaction K is included in the block by producing a merkle path that is only four 32-byte hashes long (128 bytes total). The path consists of the four hashes (shown with a shaded background) HL, HIJ, HMNOP, and HABCDEFGH. With those four hashes provided as an authentication path, any node can prove that HK (with a black background at the bottom of the diagram) is included in the merkle root by computing four additional pair-wise hashes HKL, HIJKL, HIJKLMNOP, and the merkle tree root (outlined in a dashed line in the diagram).
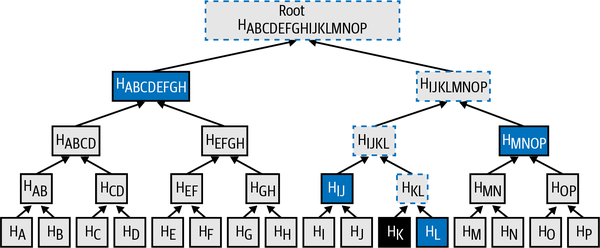
Figure 11-6. A merkle path used to prove inclusion of a data element.
The efficiency of merkle trees becomes obvious as the scale increases. The largest possible block can hold almost 16,000 transactions in 4,000,000 bytes, but proving any particular one of those 16,000 transactions is a part of that block only requires a copy of the transaction, a copy of the 80-byte block header, and 448 bytes for the merkle proof. That makes the largest possible proof almost 10,000 times smaller than the largest possible Bitcoin block.
Merkle Trees and Lightweight Clients
Merkle trees are used extensively by lightweight clients. Lightweight clients don’t have all transactions and do not download full blocks, just block headers. In order to verify that a transaction is included in a block, without having to download all the transactions in the block, they use a merkle path.
Consider, for example, a lightweight client that is interested in incoming
payments to an address contained in its wallet. The lightweight client will
establish a bloom filter (see “Bloom Filters”) on its connections to
peers to limit the transactions received to only those containing
addresses of interest. When a peer sees a transaction that matches the
bloom filter, it will send that block using a merkleblock message. The
merkleblock message contains the block header as well as a merkle path
that links the transaction of interest to the merkle root in the block.
The lightweight client can use this merkle path to connect the transaction to the
block header and verify that the transaction is included in the block. The lightweight
client also uses the block header to link the block to the rest of the
blockchain. The combination of these two links, between the transaction
and block and between the block and blockchain, proves that the
transaction is recorded in the blockchain. All in all, the lightweight client will
have received less than a kilobyte of data for the block header and
merkle path, an amount of data that is more than a thousand times less
than a full block (about 2 MB currently).
Bitcoin’s Test Blockchains
You might be surprised to learn that there is more than one blockchain used with Bitcoin. The “main” Bitcoin blockchain, the one created by Satoshi Nakamoto on January 3rd, 2009, the one with the genesis block we studied in this chapter, is called mainnet. There are other Bitcoin blockchains that are used for testing purposes: at this time testnet, signet, and regtest. Let’s look at each in turn.
Testnet: Bitcoin’s Testing Playground
Testnet is the name of the test blockchain, network, and currency that is used for testing purposes. The testnet is a fully featured live P2P network, with wallets, test bitcoins (testnet coins), mining, and all the other features of mainnet. The most important difference is that testnet coins are meant to be worthless.
Any software development that is intended for production use on Bitcoin’s mainnet can first be tested on testnet with test coins. This protects both the developers from monetary losses due to bugs and the network from unintended behavior due to bugs.
The current testnet is called testnet3, the third iteration of testnet, restarted in February 2011 to reset the difficulty from the previous testnet. Testnet3 is a large blockchain, in excess of 30 GB in 2023. It will take a while to sync fully and use up resources on your computer. Not as much as mainnet, but not exactly “lightweight” either.
Tip
Testnet and the other test blockchains described in this book don’t use
the same address prefixes as mainnet addresses to prevent someone from
accidentally sending real bitcoins to a test address. Mainnet addresses
begin with 1, 3, or bc1. Addresses for the test networks
mentioned in this book begin with m, n, or tb1. Other test
networks, or new protocols being developed on test networks, may use
other address prefixes or alterations.
Using testnet
Bitcoin Core, like many other Bitcoin programs, has full support for operation on testnet as an alternative mainnet. All of Bitcoin Core’s functions work on testnet, including the wallet, mining testnet coins, and syncing a full testnet node.
To start Bitcoin Core on testnet instead of mainnet you use the
testnet switch:
In the logs you should see that bitcoind is building a new blockchain in
the testnet3 subdirectory of the default bitcoind directory:
bitcoind: Using data directory /home/username/.bitcoin/testnet3
To connect to bitcoind, you use the bitcoin-cli command-line tool, but
you must also switch it to testnet mode:
$ bitcoin-cli -testnet getblockchaininfo
{
  "chain": "test",
  "blocks": 1088,
  "headers": 139999,
  "bestblockhash": "0000000063d29909d475a1c[...]368e56cce5d925097bf3a2084370128",
  "difficulty": 1,
  "mediantime": 1337966158,
  "verificationprogress": 0.001644065914099759,
  "chainwork": "[...]000000000000000000000000000000000000000000044104410441",
  "pruned": false,
  "softforks": [

  [...]
You can also run on testnet3 with other full-node implementations, such
as btcd (written in Go) and bcoin (written in JavaScript), to
experiment and learn in other programming languages and frameworks.
Testnet3 supports all the features of mainnet, including segregated witness v0 and v1 (see “Segregated Witness” and “Taproot”). Therefore, testnet3 can also be used to test segregated witness features.
Problems with testnet
Testnet doesn’t just use the same data structures as Bitcoin, it also uses almost exactly the same proof-of-work security mechanism as Bitcoin. The notable differences for testnet are that its minimum difficulty is half that of Bitcoin and that it’s allowed to include a block at the minimum difficulty if that block’s timestamp is more than 20 minutes after the previous block.
Unfortunately, Bitcoin’s PoW security mechanism was designed to depend on economic incentives—incentives which don’t exist in a test blockchain that is forbidden from having value. On mainnet, miners are incentivized to include user transactions in their blocks because those transactions pay fees. On testnet, transactions still contain something called fees, but those fees don’t have any economic value. That means the only incentive for a testnet miner to include transactions is because they want to help users and developers to test their software.
Alas, people who like to disrupt systems often feel a stronger incentive, at least in the short term. Because PoW mining is designed to be permissionless, anyone can mine, whether their intention is good or not. That means disruptive miners can create many blocks in a row on testnet without including any user transactions. When those attacks happen, testnet becomes unusable for users and developers.
Signet: The Proof of Authority Testnet
There’s no known way for a system dependent on permissionless PoW to provide a highly usable blockchain without introducing economic incentives, so Bitcoin protocol developers began considering alternatives. The primary goal was to preserve as much of the structure of Bitcoin as possible so that software could run on a testnet with minimal changes—but to also provide an environment that would remain useful. A secondary goal was to produce a reusable design that would allow developers of new software to easily create their own test networks.
The solution implemented in Bitcoin Core and other software is called signet, as defined by BIP325. A signet is a test network where each block must contain proof (such as a signature) that the creation of that block was sanctioned by a trusted authority.
Whereas mining in Bitcoin is permissionless—anyone can do it—mining on signet is fully permissioned. Only those with permission can do it. This would be a completely unacceptable change to Bitcoin’s mainnet—no one would use that software—but it’s reasonable on a testnet where coins have no value and the only purpose is testing software and systems.
BIP325 signets are designed to make it very easy to create your own. If you disagree with how someone else is running their signet, you can start your own signet and connect your software to it.
The default signet and custom signets
Bitcoin Core supports a default signet, which we believe to be the most
widely used signet at the time of writing. It is currently operated by
two contributors to that project. If you start Bitcoin Core with the
signet parameter and no other signet-related parameters, this is the
signet you will be using.
As of this writing, the default signet has about 150,000 blocks and is about a gigabyte in size. It supports all of the same features as Bitcoin’s mainnet and is also used for testing proposed upgrades through the Bitcoin Inquisition project, which is a software fork of Bitcoin Core that’s only designed to run on signet.
If you want to use a different signet, called a custom signet, you will need to know the script used to determine when a block is authorized, called the challenge script. This is a standard Bitcoin script, so it can use features such as multisig to allow multiple people to authorize blocks. You may also need to connect to a seed node that will provide you with the addresses of peers on the custom signet. For example:
bitcoind -signet -signetchallenge=0123...cdef -signetseednode=example.com:1234
As of this writing, we generally recommend that the public testing of mining software occur on testnet3 and that all other public testing of Bitcoin software occur on the default signet.
To interact with your chosen signet, you can use the -signet parameter
with bitcoin-cli, similar to how you used testnet. For example:
$ bitcoin-cli -signet getblockchaininfo
{
  "chain": "signet",
  "blocks": 143619,
  "headers": 143619,
  "bestblockhash": "000000c46cb3505ddd296537[...]ad1c5768e2908439382447572a93",
  "difficulty": 0.003020638517858618,
  "time": 1684530244,
  "mediantime": 1684526116,
  "verificationprogress": 0.999997961940662,
  "initialblockdownload": false,
  "chainwork": "[...]000000000000000000000000000000000000000000019ab37d2194",
  "size_on_disk": 769525915,
  "pruned": false,
  "warnings": ""
}
Regtest: The Local Blockchain
Regtest, which stands for “Regression Testing,” is a Bitcoin Core feature that allows you to create a local blockchain for testing purposes. Unlike signet and testnet3, which are public and shared test blockchains, the regtest blockchains are intended to be run as closed systems for local testing. You launch a regtest blockchain from scratch. You may add other nodes to the network or run it with a single node only to test the Bitcoin Core software.
To start Bitcoin Core in regtest mode, you use the regtest flag:
Just like with testnet, Bitcoin Core will initialize a new blockchain under the regtest subdirectory of your bitcoind default directory:
bitcoind: Using data directory /home/username/.bitcoin/regtest
To use the command-line tool, you need to specify the regtest flag
too. Let’s try the getblockchaininfo command to inspect the regtest
blockchain:
$ bitcoin-cli -regtest getblockchaininfo
{
  "chain": "regtest",
  "blocks": 0,
  "headers": 0,
  "bestblockhash": "0f9188f13cb7b2c71f2a335e3[...]b436012afca590b1a11466e2206",
  "difficulty": 4.656542373906925e-10,
  "mediantime": 1296688602,
  "verificationprogress": 1,
  "chainwork": "[...]000000000000000000000000000000000000000000000000000002",
  "pruned": false,
  [...]
As you can see, there are no blocks yet. Let’s create a default wallet, get an address, and then mine some (500 blocks) to earn the reward:
$ bitcoin-cli -regtest createwallet ""

$ bitcoin-cli -regtest getnewaddress
bcrt1qwvfhw8pf79kw6tvpmtxyxwcfnd2t4e8v6qfv4a

$ bitcoin-cli -regtest generatetoaddress 500 \
  bcrt1qwvfhw8pf79kw6tvpmtxyxwcfnd2t4e8v6qfv4a
[
  "3153518205e4630d2800a4cb65b9d2691ac68eea99afa7fd36289cb266b9c2c0",
  "621330dd5bdabcc03582b0e49993702a8d4c41df60f729cc81d94b6e3a5b1556",
  "32d3d83538ba128be3ba7f9dbb8d1ef03e1b536f65e8701893f70dcc1fe2dbf2",
  ...,
  "32d55180d010ffebabf1c3231e1666e9eeed02c905195f2568c987c2751623c7"
]
It will only take a few seconds to mine all these blocks, which certainly makes it easy for testing. If you check your wallet balance, you will see that you earned the rewards for the first 400 blocks (coinbase rewards must be 100 blocks deep before you can spend them):
$ bitcoin-cli -regtest getbalance
12462.50000000
Using Test Blockchains for Development
Bitcoin’s various blockchains (regtest, signet, testnet3, mainnet) offer a range of testing environments for bitcoin development. Use the test blockchains whether you are developing for Bitcoin Core or another full-node consensus client; developing an application such as a wallet, exchange, ecommerce site; or even developing novel smart contracts and complex scripts).
You can use the test blockchains to establish a development pipeline. Test your code locally on a regtest as you develop it. Once you are ready to try it on a public network, switch to signet or testnet to expose your code to a more dynamic environment with more diversity of code and applications. Finally, once you are confident your code works as expected, switch to mainnet to deploy it in production. As you make changes, improvements, bug fixes, etc., start the pipeline again, deploying each change first on regtest, then on signet or testnet, and finally into production.
Now that we know what data the blockchain contains and how cryptographic commitments securely tie the various parts together, we will look at the special commitment that both provide computational security and ensure no block can be changed without invalidating all other blocks built on top of it: Bitcoin’s mining function.